
I don't pretend to be an expert, I'm still learning myself. I guess I'm worried I'll get something wrong, and I've been straggling to find my next topic.
I mentioned before that I went to a workshop in February. It was a two day weekend full of learning more about improving your photography. One of the classes I went to was on a system the instructor Tim Cooper and a fellow colleague Neil Chaput de Saintonge came up with called, the Zone System for Color. It's a brilliant way of getting true to life colors everytime, with good practice.
This tip will be more suited to readers that use a DSLR or maybe Advanced Point and Shoot cameras.
Now to the meat of this post:
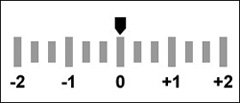
This is a diagram of a meter in the viewfinder of your camera. This is how you know if your shutter and aperture setting are too light of too dark. The middle 0 is the neutral zone, going to +1 will make the picture one stop brighter, going towards the -1 with make it one stop darker. the shorter marks indicate half stops, but I won't get into that. I'll now break down the Zone System.
+2 White with Detail: It you are shoot something in snow, fast running water, or sand, you want to more the indicator to +2. Anything higher with be pure white, otherwise.
+1 Pastel Colors: +1 is good for light colors pink, baby yellows and blue. etc. You can photograph a light blue sky or light Causasian skin.
0 Neutral tonality: This stop brings out more average colors, such as red brick or summer grass. It helps being out the reds and oranges of a sunset and sunrise as well. Asian and Latin skin tones are brought out best on this setting.
-1 Deep colors: Dark green forest and evergreens. Deep blues, reds and browns.
-2 Very Dark with Detail: This is the Black Lab zone, according to Tim Cooper. This is also good for plants in shade, wet wood, and navy blues. Anything darker with be rendered pure black with no detail.
Now, having said this, it doesn't mean you have to shoot like this no matter what. You just have to practice and get a feel for what looks right for you. Maybe you will be taking a picture of a baby in his pastel crib, but the baby has very dark skin. You'll have to decide what is most important in the to capture in the shot, the baby's environment or the baby.
Now to the subject of metering. Camera have different options for different metering modes, and Tim Cooper suggested setting your camera from Evaluative Meter to Spot Metering (this is Center-weighted Metering on my Canon) The explanation for this is long, and I don't remember all of it, so I'll keep it simple. Spot Metering only meters the center of your image. So if you have it on Spot and zoom in of our subject, it will only meter that portion of the the picture. Thus giving you a more accurate reading. You can decide from there whether you need to go higher or lower on the metering range.
If you don't know how to meter, you simply hold your shutter button half way down and the meter range will appear below in your viewfinder.
I hope this makes sense, and that I'm not jumping around to much. How i explained it enough? Do you have any related questions? Do you have and idea for a topic for next time? Comment below and I will try to help you.
Toodles!
Comments
Post a Comment